 AUD
AUD NZD
NZD
 EUR
EUR
 GBP
GBP
 USD
USD
 CAD
CAD
Total: $0.00
Taxes and shipping calculated at checkout


May 15, 2023

Self-tanning contouring is one of the most powerful beauty hacks you are probably not using yet. Instead of applying a flat, all-over tan to your face, you use self-tanner strategically — the way a makeup artist would use bronzer and highlight to define your cheekbones, slim your jawline, and create a naturally sculpted, sun-kissed glow.
The best part? Once it develops, it lasts for days. No touching up, no baking in the heat, no transferring onto your collar. Just a beautiful, effortless bronze that looks like you just came back from a week in Greece.
A self-tanning mousse with a guide colour for contouring definition, a Sunless Tanning Face and Hand Brush for precision, a velvet tanning glove as your product tray, and a clean blending sponge to feather the edges. Prep your face the night before for best results.
This viral technique has taken off on TikTok — creators like @abbybaffoe have been using self-tanning mousse to achieve a flawlessly contoured look without a drop of foundation. Using a contour brush or blending sponge to apply self-tan gives a perfect, natural-looking base.

Self-tanning contouring follows the same principles as makeup contouring. You apply darker tan to the areas where shadow would naturally fall, and leave the high points of the face the tops of the cheekbones, the bridge of the nose, the forehead lighter to catch the light.
The key difference from makeup? This tan takes 4–5 hours to develop, so it is best done at night. The result lasts days.
Exfoliate your face gently 24 hours before tanning. On the night, cleanse thoroughly, remove all makeup, and apply a light, oil-free moisturiser to any dry patches only. Clean, bare skin is your starting canvas.
Apply your self-tanning mousse to your velvet tanning glove use it as your product tray. Load your Face and Hand Brush from the glove, not directly from the bottle. This gives you far more control over the amount of product you apply.
The Sunless Tanning Face and Hand Brush is the tool that makes face contouring possible — precision application to cheekbones, jawline, nose, and hairline.
Shop the Face Brush →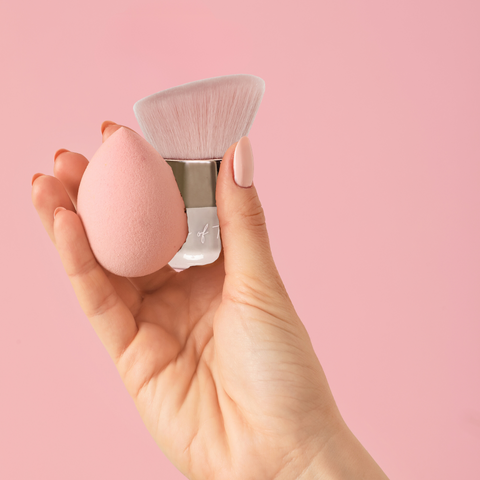
Choose a starting point the temple or the jawline works well and work outward using short strokes. Focus your deeper application on the areas below:

Once you have applied your contour lines with the brush, use a clean, damp blending sponge to soften all the edges. No harsh lines
everything should look like a natural shadow rather than a stripe. Blend in short, tapping motions rather than sweeping strokes.
Using a lighter hand, apply a thin base layer of mousse across the rest of your face forehead, nose bridge, and the centre of your chin. This is your highlight zone and should be noticeably lighter than your contour areas. Blend everything together so there are no visible boundaries.
Always blend the tan down your neck and onto your ears. These are the areas most often forgotten and they create an obvious and unflattering line if missed. Use a lighter application here and blend into your décolletage for a seamless, all-over result.
Allow 4–5 hours minimum for development overnight is ideal. Avoid touching your face, sweating, or getting wet during this time. In the morning, rinse with water only. Your contoured glow will reveal itself.
For contouring you want a self-tanner that has a guide colour this lets you see exactly where you are applying the product during the process. Our Dark Self Tanning Mousse is the ideal choice for the contour zones, giving you visible depth as you apply so you can blend precisely before the tan develops.
For the base layer over the rest of your face, our Invisible Self Tanning Mousse or Dark Self Tanning Mousse both work beautifully apply with a lighter hand for natural-looking highlight zones.
Use our Dark Self Tanning Mousse for contour zones — the guide colour lets you see exactly where to apply and blend before the tan develops.
Shop Dark Self Tanning Mousse →Moisturise daily. Apply an oil-free moisturiser morning and night. Hydrated skin holds a tan significantly longer than dry skin.
Stay hydrated. Drinking plenty of water keeps your skin plump and healthy — this directly affects how evenly your tan fades.
Always apply SPF over your tan. Use a broad-spectrum SPF 30+ before sun exposure. UV exposure causes your tan to fade faster — and protects your skin from ageing.
Reapply every 3–4 days. Your face renews its surface cells faster than your body. Top up your contour tan every 3–4 days for a consistent, maintained look.
Australian made. 100% vegan. Natural DHA. Zero orange tones. The right formula and the right tools make all the difference.
Free shipping on orders over $50. Always Australian made.
